Saturday, February 26, 2011

Steak with Mushroom Sauce

We decided to spoil ourselves tonight and have steak for dinner. We don't have steak very often because of the cost but every once in awhile it is a nice change from our usual chicken. I love this recipe because if you have leftovers you can use the steak and mushroom sauce to make another meal!


Steak with Mushroom Sauce

4 boneless New York strip steaks (8 ounces each)
1/4 cup all-purpose flour
2 tablespoons vegetable oil
1 pound sliced mushrooms
1 large onion, sliced
1 teaspoon minced garlic
2 tablespoons butter
1/3 cup white wine
1 can (14 1/2 oz) beef broth
Salt and freshly ground black pepper to taste

Sprinkle both sides of the steaks with salt and pepper to taste, then lightly coat with the flour. In a large skillet cook steaks in oil to desired doneness. Remove the steaks and keep them warm in the oven.

In the same skillet saute the mushrooms, onions, and garlic until tender, adding more oil if necessary. Stir in the wine and bring to a boil for one minute. Add broth, butter and salt & pepper to taste. Bring to a boil. Boil for six minutes or until sauce is reduced by half.  Reserve one steak and 1 1/2 cups sauce for another meal.

Serves 4
Steaks frying in the skillet.


Frying the onions.
Mushroom sauce.

We had our steak with mashed potatoes and asparagus; it was really good. I think our son is becoming a steak lover. I hope he doesn't get too used to eating like a high roller. On Tuesday I will be making the leftover steak and sauce into a soup so check back if you would like the second recipe.

Till tomorrow...

Wednesday, February 23, 2011

Chicken Adobo

I have made chicken adobo a few times before using a recipe that called for a lot of soy sauce. I thought the chicken was all right but I wasn't in a rush to make it again. Then I found a recipe in Saveur magazine for adobo that sounded easy to make and good to eat. I was excited to try this dish and use up some more of my "sale" chicken thighs.

Chicken Adobo

4 chicken thighs (about 1 lb)
4 chicken legs (about 1 lb)  I used 8 chicken thighs so feel free to use what you have on hand.
Kosher salt, to taste
14 cloves garlic, slivered
1 2/3 cups coconut, palm, or white wine vinegar (I used white wine vinegar)
2 teaspoons whole black peppercorns
10 bay leaves
Cooked brown rice

Sprinkle your chicken pieces generously with salt and place in a 14" nonstick pan. Add the chopped garlic to pan along with the vinegar, peppercorns and bay leaves. Try to submerge the garlic, peppercorns and bay leaves in the liquid. Bring to a boil over high heat; stir then lower the heat and simmer, basting chicken occasionally with liquid until meat is cooked through and most of the liquid has evaporated, about 40 minutes.

Increase the heat to medium-high. Continue to cook the chicken, turning it frequently, until crisp and lightly browned all over, 6-8 minutes.  Serve over rice
Serves 4
14 cloves of garlic.
Chicken cooking in the pan.
The last 6-8 minutes of cooking.

My husband and I enjoyed this dish. When I saw all the powerful aromatic ingredients in this recipe I was a little afraid the chicken would be too pungent. The house definitely smelled like vinegar while the chicken was cooking, but the chicken turned out moist and only lightly flavored.  I have to be honest with you and tell you this was not a hit with my kids. I don't think either of them are vinegar lovers, they ate the chicken but reluctantly. I hope you give it a try and see how you and your family like it. Let me know how it turns out, I like hearing about which recipes are hits and which are misses.

Till tomorrow...

Monday, February 21, 2011

Whore Pasta - or - if you want to be PC Spaghetti Puttanesca

In case you wondering about the title of this blog "Puttanesca" means whore in Italian. I have no idea why this dish has such a scandalous name but I do know that this pasta is delicious. I got this recipe from the Williams Sonoma catalog that I get in the mail a few times a month. (I love this catalog, I lust after all the fancy kitchen items I can't afford or have no room for.) I have tried a few recipes from Williams Sonoma and have always been happy with the results. I made a few changes to this recipe to suit my tastes and hope you and your family enjoy:

Spaghetti Puttanesca

3 tablespoons olive oil
1 yellow onion, thinly sliced
3 cloves garlic, minced
1 teaspoon minced anchovy fillet (this ingredient sounded a bit weird but try it, it adds flavor but doesn't taste fishy)
1 tablespoon tomato paste
2 cans (14.5 oz each) diced tomatoes with juices
1 tablespoon capers, rinsed and drained
1/2 cup pitted oil-cured black olives, sliced
1 can (8 ounces) tomato sauce
1/2 teaspoon dried oregano
1 teaspoon dried basil
1 teaspoon dried parsley
Freshly ground black pepper to taste
Salt to taste
1/2 cup cream
1 teaspoon granulated sugar
1 pound whole wheat spaghetti, cooked until al dente
1 pound shrimp deveined and shelled

In a large pot over medium heat, warm the oil. Add the onion and cook, stirring occasionally until tender and light brown, 12-15 minutes. Add the garlic and anchovy, cook for 1 minute. Add the tomato paste and cook one more minute.
Reduce heat to medium-low. Add the tomatoes with their juices, capers, olives and tomato sauce. Cook until sauce is thickened about 15 minutes. Add dried oregano, basil, parsley, and salt and pepper to taste. Add the cream and sugar, stir until combined.
In a separate sauce pan cook the shrimp until opaque, about 3 to 4 minutes. Season the shrimp with salt and pepper to taste. Add the cooked shrimp to the puttanesca sauce.
Mix the sauce with the pasta. Serve immediately
Serves 4 to 6 depending on how hungry everyone is.  
Onions cooking with garlic and anchovies.
Puttanesca sauce
Cooked shrimp.

Serve your finished pasta with a green salad and bask in the compliments you receive from your family.

Till tomorrow...

Sunday, February 20, 2011

Apple Pear Crisp (Gluten Free)

My brother got married in August of 2010 (yea) and his beautiful new bride Brittany has celiac disease. I had limited knowledge of celiac disease before meeting Brit but now I feel like I understand it a little bit better. Basically eating gluten can damage her small intestine and interfere with her absorption of nutrients.  Gluten is a kind of protein found in most grains, cereals, and breads. Most of what I make contains gluten so I have had to learn to think about food and how I cook in a whole new way.
  We celebrated Brittany's birthday tonight by taking her out to a restaurant we all really enjoy, Charcuterie. After a wonderful dinner we went back to her and Michael's place and had an Apple Pear Crisp which I had made earlier in the day. This was my first attempt at making a gluten free dessert and I was a little nervous about the results.

Apple Pear Crisp

For the filling:
4 Gala apples, peeled, cored and cut into 1/4 inch slices
4 Braeburn aples, peeled, cored and cut into 1/4 inch slices
2 De anjou pears, peeled, cored and cut into 1/4 inch slices
8 tablespoons apple cider (or apple juice, pear cider, water, use what you have on hand)
2 tablespoons honey
1 teaspoons allspice
Pinch of salt

For the topping:
1 1/2 cups brown sugar
1 1/2 cups gluten-free baking/pancake mix (I used gluten-free Bisquick)
2 teaspoons ground cinnamon
6-8 tablespoons unsalted butter, cut into small pieces

Preheat the oven to 350 degrees. Butter a 13 x 9 inch baking dish.
In a large bowl, toss the apple and pears with the apple cider, honey, allspice and a pinch of salt.
In another large bowl whisk together the brown sugar, gluten-free flour mix, and cinnamon. Add the butter and mix with your fingers until combined.
Sprinkle 1 cup of the topping into the bottom of the greased dish. Pour the apple/pear mixture into the baking dish. Top with the remainder of the topping mixture.

Bake for 35 to 40 minutes or until the fruit is soft and the filling has thickened. The top should be golden brown.

Serves 8
Sliced apples & pears with allspice on top.
Topping ingredients.
Apple Pear Crisp ready to bake.

We ended up liking this dessert a lot. I think next time I will try adding some gluten-free oatmeal to the topping just to give it a bit more texture. I am sure I will be trying out more gluten free recipes in the months to come and am excited to share them with all of you.

Till tomorrow...

Friday, February 18, 2011

Potato Leek Soup and Cheddar Garlic Biscuits - or - I Love Comfort Food!!

My son requested Potato Leek soup and biscuits for dinner one night this week and I decided tonight was the night. I don't get special requests too often so when I do I try to fulfill them. I have tried quite a few potato leek recipes and finally hit on one I enjoy. This soup takes around an hour to make and also requires pureeing your soup in the blender. (I am always afraid the lid of my blender will blow off and the hot soup will scald me. I know, I am paranoid.) If you have the time and are brave enough to blend hot liquids please try...

Potato Leek Soup

2 tablespoons extra virgin olive oil
4 large leeks (1 lb) white and light green parts only, cut into 1/4 inch thick slices
2 pounds russet potatoes (about 4 medium) peeled and cubed
5 cups low sodium chicken broth
3/4 teaspoon salt
Freshly ground black pepper to taste
4 oz cream cheese, cubed
1/2 cup milk
6 slices bacon cooked and crumbled

Heat the oil in a large pan over medium heat. Add the leeks and cook for 5 minutes or until the leeks are tender and just starting to get brown, stirring occasionally. Add the potatoes, chicken broth, salt and pepper, and cover. Bring to a boil, then simmer on medium-low heat (still covered) for 15-20 minutes or until the potatoes are fork tender. Take off the heat and cool for 10 minutes.

Blend the leek mixture in batches in the blender until smooth. Be sure not to fill the blender past half way and hold the lid down tight (remember paranoia, scalding, burning faces). Add the cream cheese to the last batch and blend until the cream cheese is melted.

Put the blended soup back in the pan, add the milk and cook 2 to 3 minutes or until heated through. Top the soup with bacon and serve.

Serves 8
Leeks cooking in oil.
Blended soup.

Cheddar Garlic Biscuits

2 cups bisquick
1/2 tablespoon garlic powder
1 cup shredded cheddar cheese
3 tablespoons cold butter, cut into small pieces
1 cup buttermilk

Preheat the oven to 450 degrees.

Combine the Bisquick, garlic powder, cheddar cheese, butter and buttermilk. Stir just until your ingredients are combined. If you over mix your biscuits they will be tough. 

Drop by heaping spoonfuls onto an ungreased rimmed baking sheet.

Bake 10-12 minutes or until biscuits are golden brown

Makes 9 biscuits
Biscuit batter.
Ready to bake.

We left the table with full bellies and smiles on our faces. I will be sad when the weather heats up and soup season is over. (My family refuses to eat soup on hot days.) Maybe I will search out recipes for cold soups???

Till tomorrow...

Thursday, February 17, 2011

Valentines Tea

For Valentines day I like to try to make something a little more special than what we have everyday. My kids and I really enjoy going to tea. We love the sandwiches, scones and pots of tea. We don't love the cost of going to tea (I have seen places charge 32 dollars per person, yikes) For Valentines day we thought it would be fun to make our own tea at home. I originally planned to make everything from scratch but as the day got closer decided to do a mix of homemade and store bought.

Our Tea Menu:
Assorted fruits and clotted cream
Hummus and pita bread
Pumpkin cranberry cream cheese sandwiches
Ham sandwiches with herb butter
Scones with jelly
Cookies
Tea time

Clotted Cream

4 ounces mascarpone cheese
1 cup heavy whipping cream
1 teaspoon vanilla extract
4 tablespoons powdered sugar

Beat all ingredients together until mixture resembles softly whipped cream.
Makes 1 1/2 cups

Ham Sandwiches with Herb Butter

1 stick unsalted butter, room temperature
1/2 teaspoon garlic, minced
3 tablespoons mint, chopped
2 tablespoons basil, chopped
1/2 teaspoon lemon zest
Pinch of salt

8 slices of whole wheat bread (or white bread if you prefer)
1 package (6 ounces) of your favorite deli ham

For the herb butter: Combine all the ingredients in a bowl and mix well
For the sandwiches: Lay out the slices of the bread and spread them all with a thin layer of herb butter. Place two pieces of ham on each sandwich. Top with the remaining bread slices. Place the sandwiches on a cutting board and cut off the crusts. Cut each sandwich in half crosswise and then cut each half diagonally to make triangles.
Makes 16 sandwiches
Basil, mint, lemon zest and garlic.
Herb butter

Raisin Scones

3/4 cup and 2 tablespoons all-purpose flour
2 teaspoons baking powder
2 tablespoons granulated sugar
1/8 teaspoon salt
2 tablespoons unsalted butter
1/4 cup raisins (you can use cranberries if you prefer)
1/4 cup buttermilk
2 tablespoons sour cream
1 egg
1 1/2 teaspoons milk

Preheat the oven to 400 degrees.
Whisk the flour, baking powder, sugar and salt in a large bowl. Cut butter into small pieces and rub it into the mixture until combined. Stir in the raisins. Mix together the buttermilk and sour cream and pour into the dry ingredients. Stir, but not too much or your scones will turn out tough.
Pat the dough into balls 2 inches across. Place onto a greased baking sheet and flatten slightly. Whisk together the egg and 1 tablespoon milk. Brush the top of the scones with your egg mixture.
Bake for 10 to 15 minutes or until the tops are golden brown.
Raisin scone with clotted cream and jelly.
This was a lot of fun for the kids and not too much work for me. My husband is not a huge fan of tea, but was a good sport and helped me with the prep work. This was a really nice affordable way to celebrate with my family.

Till tomorrow...

Wednesday, February 16, 2011

Chicken Drumsticks with Garlic and Herbs or Drumsticks on sale for 87 cents a pound...SCORE!

The grocery store I shop at every week had drumsticks on sale for 87 cents a pound on Super Bowl Sunday. (This is a great deal. I usually buy them for 99 cents a pound.) Since we have a full size freezer, we buy meat in bulk when it is cheap and freeze it. If the power ever went out at our house for an extended amount of time we would be out hundreds of dollars of meat. (Yikes!) 

Having this much meat on hand makes cooking dinner easier and more affordable, but it also means I have to plan my meals ahead of time. My family often laughs at me because while we are sitting enjoying our dinner I am already thinking ahead to what we are going to be eating the next day. Now that we have a lot of drumsticks, in the freezer, I have to come up with appetizing ways to serve them and I think I hit the mark with this recipe. It is pretty basic, but it is good and fast.

Chicken Drumsticks with Garlic and Herbs
It tastes better than it looks, I promise.

8 chicken drumsticks (We have a family of four so I make two per person, adjust up or down to suit your family)
4 tablespoons fresh lemon juice
1 tablespoon fresh rosemary, minced
1 tablespoon dried oregano (use fresh if you have it, I didn't)
2 tablespoons minced garlic
Salt and freshly ground black pepper to taste

Preheat the oven to 450 degrees.

Rub salt, pepper, oregano, rosemary, lemon juice and olive oil on the drumsticks to coat. If you have time let the marinade sit on the chicken for a few hours. If you don't have time, a quick dunk will do. Place the drumsticks on a foil lined baking sheet (for easier clean up) without crowding the drumsticks.

Bake the chicken without turning, until golden brown and cooked through, about 25 minutes. Check the drumsticks at 25 minutes because smaller ones will cook quickly.

Serves 4
Marinade
Before putting in the oven.

Serve with vegetables, some wild rice and enjoy.

Till tomorrow...

Tuesday, February 15, 2011

Best Tomato Cream Sauce EVER!

I cannot say enough good things about the recipe I tried tonight. I got this from the Pioneer Woman website (thepioneerwoman.com) and all I can say is...WOW!!! I liked this recipe because it was delicious. Also after you chop up the onions and garlic it is really easy to cook. It was easy enough that I was able to help my 9 year old review for his science test tomorrow while making this meal. This rarely happens.

Pasta with Tomato Cream Sauce
1 tablespoon extra virgin olive oil
1 tablespoon unsalted butter
1/2 onion, finely chopped
2 cloves garlic, minced
1 can (15 ounces) tomato sauce
Salt and freshly ground black pepper to taste
1/2 cup heavy cream
1/4 teaspoon sugar
1/2 cup grated Parmesan cheese
1/4 cup fresh basil, chopped
3/4 pound angel hair pasta (I used multi-grain since I am slowly trying to wean my family away from white pasta)

Cook the pasta in salted boiling water according to the package directions. Drain, reserving 1 cup of the pasta water.

In a medium sauce pan heat the butter and oil over low heat. Add the chopped onions and cook for 10 minutes or until golden brown. Add the garlic and cook for 1 more minute. Pour in the tomato sauce and add salt, pepper and sugar to taste. Stir and cook over low heat for 25 minutes, stirring occasionally. (you can help your kids with their homework at this point) Remove from heat and stir in cream.

Add the Parmesan cheese then check seasonings. Stir in the pasta and chopped basil and serve immediately. (Thin the sauce with pasta water before adding the basil if needed, I added about 1/4 cup of the pasta water to my sauce)

Serves 4
Immediately after adding the tomato sauce to the pan.
Cooking the pasta.
The sauce after 25 minutes of cooking.
My husband and I had a salad with our pasta and our kids had a handful of grapes. I will be making this again in the near future. There are a lot of variations I would like to try with this recipe. I could add vegetables, meatballs, pancetta, etc. The possibilities are endless.

Till tomorrow...

Sunday, February 13, 2011

Easy Ice Cream Cake

We celebrated my father-in-laws birthday tonight so I didn't have to cook dinner. I was responsible for making dessert for everyone and decided to make an ice cream cake. I had wanted to make one for awhile and my father-in-law loves ice cream so I thought this would be the perfect occasion to make one for everyone. I told my husband this recipe didn't really feel like cooking; it felt more like assembling food.

Easy Ice Cream Cake
28 Oreo cookies
1 pint strawberry ice cream, softened (or your favorite kind of ice cream)
2 cups thawed Cool Whip, divided
1 pint chocolate ice cream, softened (or your second favorite kind of ice cream)
2 tablespoons chocolate fudge sauce

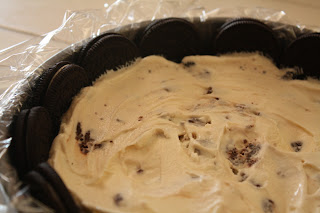
Line a 9 inch round cake pan with plastic wrap. Put 14 whole cookies around the edge of the pan. Crush the remaining Oreos. (I put them in a ziploc sandwich bag, sealed the bag, and crushed the cookies.) Place the crumbs on the bottom of the pan, reserving 1/2 cup. Put the strawberry ice cream over crumbs; top with 1 cup of the cool whip and remaining crumbs. Top with chocolate ice cream.

Freeze the cake for at least four hours. (I froze it overnight.) Remove from the pan by lifting the plastic wrap. Carefully peel off the plastic wrap. Let the cake stand for 10 minutes. Top with remaining 1 cup whipped topping and drizzle with chocolate sauce.

Makes 14 servings (It doesn't look like it, but the cake is really rich.)
Cookies on the sides/bottom
These were the ice creams I used.
First layer of ice cream.
Second layer of ice cream.
This was a really easy cake to "make" and I love how you can switch the ice creams around for whoever you are making the cake for. I think this would be a great cake for a kids party and this will be the cake I make for my 10 year old son's birthday in a couple of months.

Till tomorrow...

Thursday, February 10, 2011

Almond Bars or disappointing dinner saved by a delicious dessert

Tonight was one of those nights where nothing seemed to go right. The dinner I had been planning (and chopped 4 pounds of onions for last night) ended up being disappointing. I tried to make French onion soup (only the second time I have ever tried it) and was not happy with the results. The soup was missing something, I just couldn't figure out what. The onions were not soft enough, even after cooking for 10 hours, we all ate it but I wouldn't ever share the recipe. I think maybe I will save French onion soup for when my husband takes me out to dinner.  So instead of writing about our mediocre dinner I will write about the snack I made for my MOPS group tomorrow. About a year ago my family and I were invited to one of our associate pastors homes for dinner. His wonderful wife made us a great meal and for dessert served us almond bars. I had never tried them before but instantly loved them and asked for the recipe. These have been a family favorite since then, I make them when I need something delicious but don't have the time or money to go to the store. I hope you enjoy them as much as I do.  

Almond Bars
4 large eggs
2 cups granulated sugar
1 cup unsalted butter, melted
2 cups all-purpose flour
2 1/2 teaspoons almond extract (I use imitation because my daughter is allergic to nuts)
Powdered sugar

In a large bowl mix the eggs and sugar until well blended. Add the butter and almond extract. Slowly stir in the flour and mix thoroughly. Pour into a greased 9 x 13 inch pan. Bake at 325 degrees for 25-30 minutes or until a toothpick inserted in the center comes out clean. Sprinkle with powdered sugar before serving.
Yield: 2 dozen
Melted butter
Eggs and sugar
The batter about to be poured into the baking pan.

That is it, how easy can you get? One reason I like this recipe is that it calls for melted butter. When a recipe calls for softened butter I usually forget to take out my butter and have to try to soften it in the microwave without melting it, with this recipe I don't have to plan ahead. I hope dinner tomorrow goes a little smoother. I would like to thank Vera Christian for sharing this recipe with me.

Till tomorrow...

Wednesday, February 9, 2011

Light Cheese Bread and Blueberry Crisp or Carbohydrate Heaven

We had a nice, relaxing dinner at my mother and father-in laws house tonight. My wonderful in-laws (Bruce and Rosie) watched our daughter for a few hours so my husband and I could both take our son to his art lesson. I thought it would be nice to take dinner to my in-laws house for us to all share together. I took it easy on the main course and made soup from a package. After the hours I was in the kitchen last night I needed a break. I did however make a loaf of bread to accompany the soup and my daughter and I made the dessert together. I was excited to try a recipe for cheese bread I found in The Best of America's Test Kitchen Best Recipes and Reviews 2011. I bought this magazine around a month ago and want to try almost every recipe, they all look so good. I really love the convenience of "quick" breads, there is no kneading or waiting for the dough to rise.

Light Cheese Bread
2 ounces Parmesan cheese, shredded on the large holes of a grater. (2/3 of a cup)
2 1/2 cups all-purpose flour
1 tablespoon baking powder
1 teaspoon salt
1/4 teaspoon dry mustard
1/8 teaspoon cayenne pepper (I was out of cayenne pepper, so just used 1/4 teaspoon of black pepper)
1/8 teaspoon black pepper
3 ounces extra-sharp cheddar cheese, cut into 1/4 inch cubes (3/4 cup)
1 1/4 cups low-fat buttermilk (I didn't have buttermilk so I put 1 tablespoon of lemon juice into 1 1/4 cups low-fat milk and let it sit for 10 minutes before using)
1 tablespoon vegetable oil
1 large egg

Heat the oven to 350 degrees. Spray a bread loaf pan (8 1/2 by 4 1/2 inch) with non stick cooking spray. Sprinkle 3 tablespoons of Parmesan cheese evenly over the bottom of the pan, and set aside. Whisk the flour, baking powder, salt, mustard, cayenne, and black pepper together in a large bowl. Stir in 3 tablespoons more Parmesan and the cheddar, breaking up any clumps. In a large bowl whisk the buttermilk, oil and egg together until smooth. Fold the buttermilk mixture into the flour mixture. The batter will be extremely thick, be sure not to overmix. Put the batter into the loaf pan and sprinkle the remaining Parmesan evenly over the top. Bake until golden brown and a toothpick inserted into the center comes out clean, 45 to 50 minutes. Let the loaf cool in the pan for 5 minutes, then turn it out onto a wire rack and let cool for 1 hour before serving. The bread can be wrapped tightly in plastic wrap and stored at room temperature for up to 3 days.
Makes one 8-inch loaf
Coarsely grated Parmesan cheese.
Cheese bread batter.
Ready to cook.
This was a very tasty loaf of bread, I hadn't planned on making it so I was glad I could throw it together with ingredients I had in the house. I had enough of the bread left over to make sandwiches for my kids to take to school tomorrow, that will be a nice change of pace for them.

For dessert my daughter and I made blueberry crisp. The kitchen was a wreck when we were done (four year olds are not the neatest) but we had a good time together.

Blueberry Crisp


3 cups fresh or frozen blueberries, washed
1/4 cup white sugar
1 cup oatmeal
1 cup brown sugar
1/2 cup all purpose flour
1/4 teaspoon ground nutmeg
1/2 teaspoon cinnamon
1/2 cup butter, softened
Non stick cooking spray

Preheat the oven to 375 degrees. Put the blueberries and white sugar into a large bowl and mix. Spray a 9 x 13 inch dish with cooking spray, then pour in the blueberry mixture. In a medium bowl mix the oatmeal, brown sugar, flour, nutmeg, cinnamon and butter. Sprinkle the oat mixture over the blueberries. Bake for 35 minutes.
Serves 6
Blueberries and sugar.
Ready to bake.
Wow the blueberry crisp was delicious. This dessert was really easy to make and was gone in seconds.  I think the only way this could have been any better would have been if we had served it with vanilla ice cream. I am getting hungry just thinking about it.

Till tomorrow...