Tuesday, February 8, 2011

Mushroom and Lentil Pot Pies with Gouda Biscuit Topping

I make a lot of chicken pot pies because it is a tasty way to use up leftover chicken. When I saw this recipe in the November 2010 issue of Bon Appetit magazine I thought it sounded like a nice change from our usual chicken pies. I also thought this would be a good meal to make for the rare vegetarian who wanders into our bastion of meat lovers.

Mushroom and Lentil Pot Pies with Gouda Biscuit Topping

Filling
1/2 cup lentils
1/4 teaspoon salt
1 ounce dried porcini mushrooms (I couldn't find these in my market so I used dried stir fry mushrooms)
2 tablespoons olive oil, divided
6 ounces fresh mushrooms, sliced
1 medium onion, chopped
1 carrot, cut into 1/4 inch thick rounds
1 1/2 teaspoons dried sage
1/4 teaspoon dried thyme
1 large garlic clove, minced
2 tablespoons all purpose flour
2 medium Yukon Gold potatoes, peeled, cut into 1/2 inch chunks (I was lazy and didn't peel mine)
4 teaspoons low-sodium soy sauce
1 tablespoon tomato paste

Topping
1 cup plus 2 tablespoons all purpose flour
6 tablespoons yellow cornmeal
1 1/4 teaspoons baking powder
1/2 teaspoon salt
4 teaspoons chilled unsalted butter, diced
1/2 cup buttermilk (I didn't have any buttermilk in the house so I used low-fat milk)
3/4 cup (packed) grated Gouda cheese (3 ounces)

Filling: Mix 3 cups cold water, lentils and 1/4 teaspoon salt in a medium saucepan, bring to a boil. Reduce heat to low, cover and simmer until lentils are tender, 25 to 30 minutes. Drain, set lentils aside.

Pour 3 cups boiling water over dried porcini mushrooms in medium bowl; soak 25 minutes. Remove mushrooms from soaking liquid, squeeze dry, and chop coarsely. Don't throw away the soaking liquid, save it to use later.

Heat 1 tablespoon olive oil in a large skillet over medium heat. Add fresh mushrooms, cook for 3 minutes. Add 1 more tablespoon of olive oil, onion, carrot, sage and thyme. Saute 4 minutes. Add garlic; saute 30 seconds. Reduce heat to medium-low.

Mix flour into vegetables; cook 1 minute. Add porcini soaking liquid. Mix in porcini, potatoes, soy sauce and tomato paste. Cover; simmer until potatoes are tender, stirring occasionally 13 to 15 minutes. Add lentils; season with salt and pepper. Put the filling in a 9 x 13 inch baking dish.

Topping: Preheat oven to 400 degrees. Combine flour, cornmeal, baking powder and salt in food processor; blend 5 seconds. Add butter; pulse until mixture resembles coarse meal. Add buttermilk; pulse until dough forms moist clumps.

Put heaping tablespoons of the batter on top of the pot pie filling. Top the dough with cheese. Bake pot pies until a toothpick inserted into biscuit topping comes out clean, about 30 minutes.

Serves 4
Boiling lentils 
Dried Mushrooms (before adding the boiling water)
Re-hydrated Mushrooms
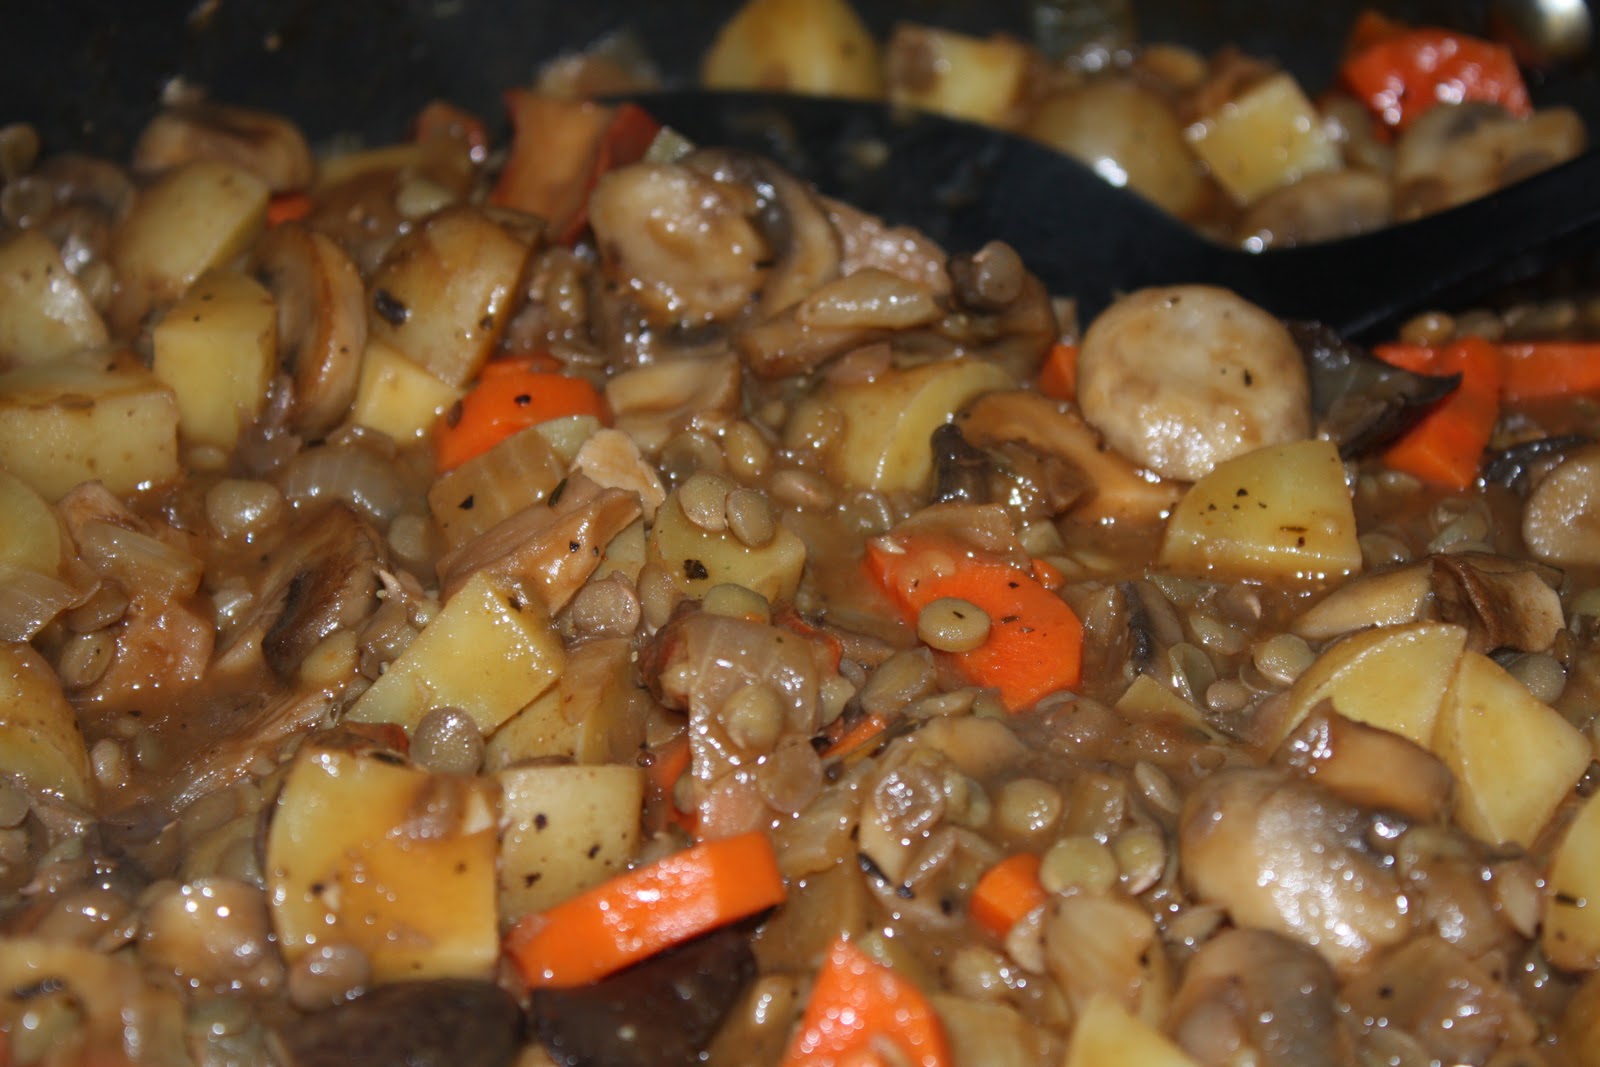
Finished Pot Pie Filling
Immediately before putting in the oven.
These were really tasty pot pies but I was in the kitchen for 1 hour and 40 minutes putting them together. This is way too long for a weeknight meal. I need to make a rule that I will not make any Bon Apetit meals on a weeknight. I always think I cook faster than I actually do. Oh well, live and learn.

Till tomorrow...

Sunday, February 6, 2011

Cheesy Steak Sandwiches with Butter and Parmesan Mashed Potatoes

I love Super Bowl Sunday because it gives me an excuse to make steak and potatoes, one of my favorite combinations. About a month ago my family and I saw Rachel Ray make a steak sandwich and potatoes on her 30 Minute Meal show that looked amazing. As soon as we saw the finished result  we all agreed we had to try the recipe. I tinkered with the recipe a bit (as I always seem to) to suit my families taste. I hope you will do the same if you try the following:

Cheesy Steak Sandwiches with the Works
Cheesy Steak Sandwich
4 flat iron steaks, 6 - 8 ounces each
Extra virgin olive oil
Steak seasoning (we had a bottle of Canadian steak seasoning in our pantry, whatever you have on hand should work fine)
2 green bell peppers, cut into thin slices
1 clove garlic, peeled and crushed
1 large onion, thinly sliced
2 tablespoons butter
2 tablespoons all-purpose flour
1 1/2 cups low fat milk
Salt and freshly ground black pepper
Ground nutmeg
1 cup grated provolone cheese
1 cup marinated mozzarella cheese
2 loaves asiago cheese bread, about 12 inches long

Put the steaks on the counter to warm up a bit while your grill heats to medium-high. Coat each steak with around 1 teaspoon of extra virgin olive oil and sprinkle with steak seasoning.

Heat 2 tablespoons of extra virgin olive oil in a skillet over medium heat. Add the bell peppers, and onions and cook until very tender 12 to 15 minutes, add the garlic during the last few minutes of cooking. When the vegetables are golden brown and tender remove from the heat. Heat the oven to 250 degrees.

While the peppers cook, put the steaks on the hot grill and cook 6 minutes on each side for medium rare steaks.

Meanwhile place a sauce pan over medium heat and melt the butter in it. After the butter has melted, whisk in the flour and stir constantly for 1 minute. Whisk in the milk and season with salt, pepper and nutmeg. Remember you will be adding salty cheese so don't go overboard on the spices. Thicken the sauce for a few minutes, then reduce the heat to low.

After the steaks are cooked, put them on a cutting board and let them rest for 5 minutes. Thinly slice the steaks on an angle against the grain of the meat. While the steak rests, warm the bread in the oven. Stir the cheese into the sauce.

To serve cut the bread lengthwise and place the steak slices evenly across the bottoms of the bread. Top the steak with the sauce, peppers and onions. Cover with the bread tops and cut the sandwiches into four portions.

Serves 6
Steaks oiled, seasoned and ready to grill.
Frying the onion and bell pepper.
Finished cheese sauce.

We enjoyed these sandwiches but I felt pretty guilty about how unhealthy they were. I felt like we would have been just as happy to have the steaks topped with just bell pepper and onions, leaving out the bread and cheese sauce. This recipe also kept me pretty busy and I didn't feel as relaxed in the kitchen as I normally do. 

Because of these reasons I probably wouldn't make them for just us again. I might pull them out in a pinch if we decide to host a Super Bowl party, but I would enlist plenty of help in the kitchen.

We had Butter and Parmesan Mashed Potatoes as our side dish tonight and I would make these again in a heartbeat. They are easy to make and tasted divine.

Butter and Parmesan Mashed Potatoes

Yukon gold potatoes cooking away.
2 pounds baby Yukon gold potatoes
2 cups low sodium chicken broth
2 tablespoons extra virgin olive oil
Freshly grated black pepper, salt to taste
2 tablespoons butter
1/2 cup shredded Parmigiano-Reggiano cheese

Place the potatoes in a medium pot in a single layer (If you have a pot that is big enough. Mine was just a pinch too small). Pour in enough broth to come 1/4 inch up the sides of the potatoes (be careful pouring the broth it is easy to add too much). Add the olive oil.

Cover, bring to a boil, reduce heat to simmer and let the potatoes cook for 10 minutes. Remove the lid, raise the heat and reduce the broth.

When the broth evaporates, mash potatoes to flatten them a bit using a potato masher. Crisp the potatoes a few minutes on each side (stir frequently, they brown quickly), then season with salt and pepper. Stir in the butter and cheese.

Serves 4-6

This was an extremely filling meal but I keep telling myself Super Bowl Sunday only comes once a year.

Till tomorrow...

Pizza Two Ways

I was responsible for providing snacks for my book club tonight and wanted to try something a little different. We have a lot of wine lovers in our group and decided to have a wine tasting before our book discussion.

My husband and I went out to Trader Joes and picked a few wines that looked promising. We chose a 2008 Mouton Cadet Bordeaux which intrigued us with a blend of 60% Sauvignon Blanc, 30% Semillion, and 10% Muscadelle. We paid $7.99 for the bottle. The second bottle we tried was a 2009 Hamilton-Steven's Pinot Noir from the Russian River Valley. We love Pinots from the Russian River Valley and we really loved the $8.99 price tag. 

I decided to make two different pizzas, one to go with the Bordeaux and one to go with the Pinot Noir. The first pizza I made was an Artichoke and Fontina Pizza. I got the recipe from the December 2009 issue of Food & Wine magazine.

Artichoke & Fontina Pizza

Artichoke & Fontina Pizza


You have to start this recipe the day before if you are marinating your own artichokes, so plan accordingly. If you don't want to marinate your own artichokes buy a jar of marinated artichokes from the store and save yourself some prep time.

16 ounces frozen artichoke hearts, thawed
2 teaspoons lemon juice
1 cup of olive oil
3 smashed garlic cloves
2 sprigs fresh thyme
2 sprigs fresh rosemary
1 bay leaf
salt and pepper to taste
2 (8 oz) balls of store bought pizza dough
1 tablespoon cornmeal
2 1/2 cups grated fontina cheese
4 ounces crumbled goat cheese

To make marinated artichokes take your thawed artichokes and place in a medium size bowl. Add the lemon juice, olive oil, smashed garlic cloves, thyme, rosemary, bay leaf and salt and pepper to taste. Cover and refrigerate overnight or up to three days.

Preheat your oven to 425 degrees. Roll the pizza dough onto a cutting board sprinkled with cornmeal. Put the dough on baking sheets and bake for around 8 minutes, or until lightly browned.

While the dough cooks chop the artichokes into bite size pieces and drain them on paper towels. When the 8 minutes cooking time is up take the pizza dough out of the oven. Sprinkle the cheeses on the dough, then put the artichokes over the cheese. Season with salt, pepper and a few leaves of rosemary then return the pizzas to the oven.

They are done when the edges are browned; about 10 minutes.
Marinated Artichokes
About to go in the oven
The pizza went will with the wine and was very tasty. I enjoyed the Bordeaux so much I am already planning a trip to Trader Joes to stock up on some more bottles. I only marinated my artichokes for one night and didn't think they were flavorful enough, so next time I will try to marinate them for three days. Other than that, I really enjoyed this recipe. The fontina and goat cheese were a delicious combination.

Puff Pastry Pizza with Marinated Mozzarella and Cherry Tomatoes

The next pizza I made is one of my all time favorites; puff pastry pizza with marinated mozzarella and cherry tomatoes. I have made this a handful of times and always get rave reviews.
Puff Pastry Pizza with Marinated Mozzarella and Cherry Tomatoes
12 ounces of cherry tomatoes (heirloom if possible)
1 tablespoon of extra virgin olive oil
3/4 teaspoon coarse kosher salt
1/2 teaspoon dried oregano
2 sheets frozen puff pastry (1 lb total), thawed
2 tablespoons melted unsalted butter
4 tablespoons finely grated Parmesan cheese
3/4 cup coarsely grated marinated mozzarella cheese
1/2 bell pepper cut into thin strips
1/3 cup quartered pitted black olives
2 teaspoons coarsely chopped fresh oregano

Preheat oven to 400 degrees.

Toss tomatoes, olive oil, salt and dried oregano in a medium bowl. Scatter tomatoes on a large rimmed baking sheet. Roast until soft and beginning to collapse, about 22 minutes. Remove from the oven and let the tomato mixture cool. Keep the oven on 400 degrees.

Brush 1 tablespoon melted butter on a rimmed baking sheet. Place the puff pastry on top of the butter. Brush remaining butter on top of the pastry. Sprinkle with 4 tablespoons of Parmesan cheese. Sprinkle with grated mozzarella leaving a half inch plain border. Top with roasted tomatoes, pepper strips and olives.

Bake pizza until pastry is crisp, about 25 minutes. Sprinkle 2 teaspoons fresh oregano over the pizza and serve.
Ready to Roast
Right before putting in the oven.

The pizza came out perfectly and my cousin Elizabeth declared it to be the best pizza she had ever eaten! High praise indeed. Opinions were mixed on the Pinot Noir, but I thought for the price it was a good wine. It is hard to find decent bottles of red wine for under $10.00 so whenever we find a bottle we like we try to stock up.

It was a little bit hectic trying to make the two pizzas at once but the party came off without a hitch.


Till tomorrow...

Thursday, February 3, 2011

Light and Fluffy Waffles

We had breakfast for dinner tonight because I needed something that I could make quickly. I have had this recipe by Marion Cunningham (famous cook/author) on my refrigerator for months and finally decided to try it tonight. I knew I was going to be rushed at dinnertime so I made the batter in the morning, let it sit all day and just had to cook the waffles when I got home from work.

Marion Cunningham's Raised Waffles
Waffles and Bacon 
1/2 cup warm water
1 package (2 1/2 teaspoon) dry yeast (Be sure to use active dry yeast, not instant yeast)
2 cups lowfat milk, warmed for around 30 seconds in the microwave
1 stick (1/2 cup) unsalted butter, melted and cooled slightly
1 teaspoon salt
1 teaspoon sugar
2 cups all-purpose flour
2 large eggs, lightly beaten
1/4 teaspoon baking soda

Pour the water into a large mixing bowl. (Remember to leave room for the batter to rise.) Sprinkle the yeast over the water and let it stand for 5 minutes. Add the milk, melted butter, salt, sugar, and flour and mix until smooth. Cover the bowl with foil and let it stand overnight at room temperature. (Or if you are making the waffles for dinner let your mixture sit out all day until you are ready to cook.)

Preheat your waffle maker. Add the eggs and baking soda and mix well. (The batter will be extremely thin but don't worry it is supposed to be like that.) Grease your waffle maker with nonstick cooking spray if desired then pour some batter into the waffle maker. I can't tell you exactly how much to add because it depends on your waffle maker. I always seem to add a little too much to mine and a bit flows out the sides. Play around with it, remember cooking is supposed to be fun. Cook your waffles until golden and crisp.

Serve immediately with hot maple syrup, yum.

Serves 4 to 6
Waffle batter before rising.
Waffle batter after rising.
Cooking in the pan (can you tell I didn't pour enough batter?)

This was my first time making waffles with yeast and I was amazed at how light and fluffy these were. I was a bit worried at how intense the yeast smell was at first, but after the waffles cooked the smell diminished. Next time I make these I am going to play around with the batter a bit and add blueberries, or maybe some chocolate chips.

Till tomorrow...

Wednesday, February 2, 2011

Rice Pudding - or - still trying to use up my leftover rice

Tonight was leftover night, so I decided to make the evening a little more special by making dessert. Since I still had a lot of leftover rice I used it to make rice pudding. I have found most people either love rice pudding or hate it, I think it has something to do with the texture. We fall on the love it side, and every time I make it I think, why don't we have this more often. I hope you try the following recipe and agree.

Rocking Rice Pudding
Yummy Rice Pudding
3 cups of rice (white or brown), cooked
3 cups lowfat milk
2/3 cup of granulated sugar
2 tablespoons unsalted butter
1/2 cup of raisins
1 teaspoon vanilla extract
1 teaspoon cinnamon, divided

Put the cooked rice, milk, sugar and butter in a medium saucepan, stir to combine. Add the raisins and vanilla extract and stir again.

Cook the mixture for 25 minutes over a low flame until most of the liquid is absorbed. Be sure to stir occasionally and add more milk if the pudding starts to stick to the bottom.

Once the pudding is thick and creamy take it off the heat.  Mix in 1/2 teaspoon of cinnamon. Put the pudding in a serving dish and sprinkle the remaining cinnamon on top. You can serve this with whipped cream if you like.

Serves 4-6
Butter, milk, rice and sugar
Bubble bubble toil and trouble
I usually double this recipe because rice pudding goes fast in our house. I am still trying to decide if rice pudding is an acceptable breakfast food.

Till tomorrow...

Tuesday, February 1, 2011

Bacon Fried Rice - everything tastes better with bacon.

I had a lot of leftover rice in my refrigerator from a dinner we had over the weekend. So for dinner tonight I decided to do what I always do with leftover rice, make fried rice. I often  fall back on this recipe because it is quick and tasty. If I can get dinner on the table in under thirty minutes I am a happy person.

Bacon Fried Rice
Dinner time


4 cups of cooked rice (white or brown)
8 strips of bacon
2 tablespoons of vegetable oil
1 medium onion, chopped
2 garlic cloves, finely sliced
2 tablespoons low sodium soy sauce
One 10 oz package of frozen mixed vegetables, thawed
5 large eggs, lightly beaten and seasoned with salt and pepper
2 teaspoons sesame oil
Salt and freshly ground black pepper to taste

In a large saucepan cook the bacon over medium heat until crisp. Drain on a paper towel lined plate, chop into 1 inch pieces when cool enough to handle. (I use kitchen shears to cut my bacon)
Wipe the bacon grease out of your skillet. Return the skillet to the stove and keep your flame on medium heat. Add the vegetable oil and the onion and cook the onion until golden brown, about 10 minutes. Add the garlic and cooked rice and stir. Add the mixed vegetables and soy sauce and stir again. Make a hole in the middle of the rice and add the eggs. Let the eggs set for 1 to 2 minutes, then mix them with a fork and cook for 2 more minutes. Stir the eggs into the rice, breaking them up into small pieces. Take the saucepan off the stove, add the sesame oil and bacon and stir.
Serves 4-6 depending on how hungry everyone is.

Does anything look better than frying bacon?
Right after the eggs were added.
While the rice is cooking. 

Another plus about this recipe is that there are hardly any dishes to wash. Since my husband washes the dishes whenever I cook he likes to keep the mess to a minimum. I still have rice leftover even after making this recipe so tomorrow night we will be having rice pudding for dessert. Yum.

Till Tomorrow...

Monday, January 31, 2011

Pulled Pork Sandwiches - slowcooker recipe

The bigger my kids get the busier our evenings seem to be. I am trying to find more slow cooker recipes I can make when I know I will have a hectic day. I have been relying more and more on frozen Trader Joe meals for our busy nights but feel guilty about all the sodium and fat in those meals. I made these sandwiches tonight and was very happy with how much meal we got out of an affordable piece of meat. I like the amount of vegetables in this recipe, even my picky eater ate most of them.

Pulled Pork Sandwiches

2 1/2 pounds pork shoulder
1 cup peeled and shredded carrot (1 large carrot)
1 large red bell pepper, diced
1 medium onion, thinly sliced
1 cup water or beer (I used Corona)
1 (12 ounce) jar bbq sauce (the final taste of the meat really depends on the quality of the bbq sauce so try to buy a good brand)
8 whole wheat hamburger buns, toasted

Add the pork, carrot, bell pepper, onion, water or beer, and half the bbq sauce to a 5 or 6 quart slow cooker and stir to combine. Cover and cook on high for 4 hours.

After 4 hours on high, drain about 3/4 of the liquid. Take out the pork, chop the meat coarsely and discard the excess fat. Put the pork back in the slow cooker and add the other half bottle of bbq sauce to the pot. Cover and cook on high for 4 more hours.

When the meat is done, remove from the slow cooker and place on a cutting board. Use two forks to pull the meat into shredded pieces. Put the meat back into the slow cooker, divide the pork mixture evenly between the hamburger buns and serve.
In the pot and ready to cook
Thinly sliced onions
Diced red bell pepper
Shredded carrot
Pork Shoulder

This recipe fit my criteria of being quick to assemble, easy on the pocket book and tasty.  It is a keeper for our family.

Till tomorrow...